Sunday, December 21, 2014

DIY wreath

Want a cute christmas decoration but you're on a budget? That was me today, so I decided to make something on my own.
I had an old wire hanger and some gold/red ribbon, so I went to the xmas faire and bought cheap materials:
1 green garland. 300 pesos.
1 tea light (battery operated). 790 pesos.
12 tree decoration balls. 1000 pesos.
Total spent: 2090 pesos = 2.7 euros = 3.4 US dollars.

So all I did was twist the wire hanger into a circular shape, leaving a hook at one end (to hang the wreath), another little hook at the other end (to close the circle), and a loop in the middle fitted to put the tea light in (it had to be tight so the light doesn't fall).
I twisted the garland through the wire in loops and alternated the xmas balls in a way I liked.
I made a sort of decorative knot with the ribbon and knotted it on top.
Done!


posted from Bloggeroid

Saturday, November 15, 2014

More food

I made lunch today, a veggie pizza, spinach and potato salad, and:
Ice cream! I didn't make it though XD, green apple/lemon flavour (too bad the green-yellow colors don't really show in the pic) and a cookie.

posted from Bloggeroid

Sunday, November 9, 2014

Sweet

I ate two peanut butter cups for dessert today, they were that Great Value brand that walmart offers in the Lider supermarkets here in Chile. I liked them, I find Reese's (sp?) too sweet, but because these are small they seem more decent lol.


posted from Bloggeroid

Thursday, October 30, 2014

Ichigo no produce

We got 2 kg of super yummy strawberries at the market for 1.000 chilean pesos, which would be around 4 pounds for 1.3 euros / 1.7 US dollars, pretty good if you ask me.
Bro made preserves, which ended up with the same consistency as store-bought jam but soooo much better! Delicious taste and awesome smell ^___^


posted from Bloggeroid

Sunday, August 10, 2014

Omnoms

I made bare bones sushi today, *sighs* why do I like it so much?


posted from Bloggeroid

Friday, April 25, 2014

A little DIY seven

I didn't know making friendship bracelets, and other kinds of bracelets as well, was so friking easy.
It's basically just different types of knots, some string (could be any type too) and whatever else you choose to adorn it with if you want to get fancy. I had buttons, a little plastic ball and translucent beads. So easy.


posted from Bloggeroid

Tuesday, April 1, 2014

Manga rant.

I just finished reading Yankie-kun to Megane-chan.

WTF? Seriously? Are you kidding me? Tell me you're joking, mangaka-sensei, tell me- what? It's not a joke, that was really the ending? That piece of cra- OMG, I hate you now... they say the series got axed because of low ratings... you know what? That's still no excuse. That is one of the most disappointing endings I've ever read, and there has been some doozies...
I liked this manga so much, it was so funny, then I saw how it got serious with hana-chan's "mysterious family drama" (not mysterious at all, one could tell from a mile away they were yakuza) but I had faith in you, sensei, I foolishly thought if anyone could make this still-funny-in-highschool-and-lighthearted it's you, but nooooo, you had to have hana-chan suddenly disappear, like she's not a central character to the story. I really felt her absence. The rest of the gang went about with their lifes... shinagawa became a highschool teacher at Monshiro high... and then hana reappears... as a 22 year-old student, urging shinagawa to go to the friking field trip with his class? WHAT?
Some say it was so impossible it felt like a hallucination shinagawa had, that hana-chan never came back. I would accept that, as sad and horrible as it sounds, because it would be better.
But according to interviews, she did go back to highschool in the end, because she never graduated, never went to uni (how in the hell would she get accepted at Tono uni without actually graduating highschool?), and you expect me to believe the corresponding authorities would let her go to school again with actual teenagers like nothing happened? Like she's not a grow-ass woman? I don't know how things like that work in real life Japan, but I really don't think they would let adults who never finished schooling go back to study with the current youths. And yes, I realize this is a manga, therefore fantasy but come on!
Ugh. Now I wished I had known beforehand about this before starting to read your next manga, Yamada-kun and the 7 Witches... because I'm really nervous, you made me doubt you, sensei, and I can feel how you're dragging this series along because it got popular... which makes me believe you let yourself be bullied by the manga industry demands, by money, and your artistic views and your stories be damned... right? You make me love your work... only to slap my face with mediocrity in the end? Is that what's going to happen with Yamada-kun too?

Sorry about this, but I had to rant somewhere.

posted from Bloggeroid

Saturday, March 29, 2014

A little DIY six

Mum had this yarn, it's so soft, and she didn't know what to do with it, so I made her a couple of bracelets. They looked so kawaii that I called them "marshmallow bracelets".
Cast on 11 stitches.
1. Knit all
2. Purl all.
3. K1, C6f, K4.
(C6f = slip 3 sts on cable needle and leave in Front, knit 3, knit the 3 on cable needle).
4. Purl all.
5. Knit all.
6. Purl all.
7. K4, C6b, K1.
(C6b = slip 3 sts on cable needle and leave in the Back, knit 3, knit the 3 on cable needle).
8. Purl all.
Repeat rows 1-8 until desired length, sew ends together, weave in tails.


posted from Bloggeroid

Tuesday, March 25, 2014

A little DIY five

I knitted a beanie hat for bro. Consider this your birthday present, so happy waaaaaay early birthday, dear brother!!!
4 mm straight needles with #3 light yarn. The yarn label said it should be worked with 2 1/2 mm needles but I didn't think so, hehe.
Cast on 120 +1 stitches
I did a 3x3 rib for 4 cm and then I decreased 2 knit stiches and 2 purl stitches (K2tog, K1 and P2tog, P1)all the way through which left me with 81 stitches.
I knitted all for 16 cm and then I decreased on every knit row like this:
K2, K2tog. And the wrong side Purl all.
K2, K2tog. Purl.
K1, K2tog. Purl.
K1, K2tog. Purl.
K2tog. Purl
K2tog. Purl. This left me with 4 stitches, I finished by threading them with the tail with a tapestry needle and sewing the sides together. Weave in the ends.


posted from Bloggeroid

Monday, March 17, 2014

A little DIY four

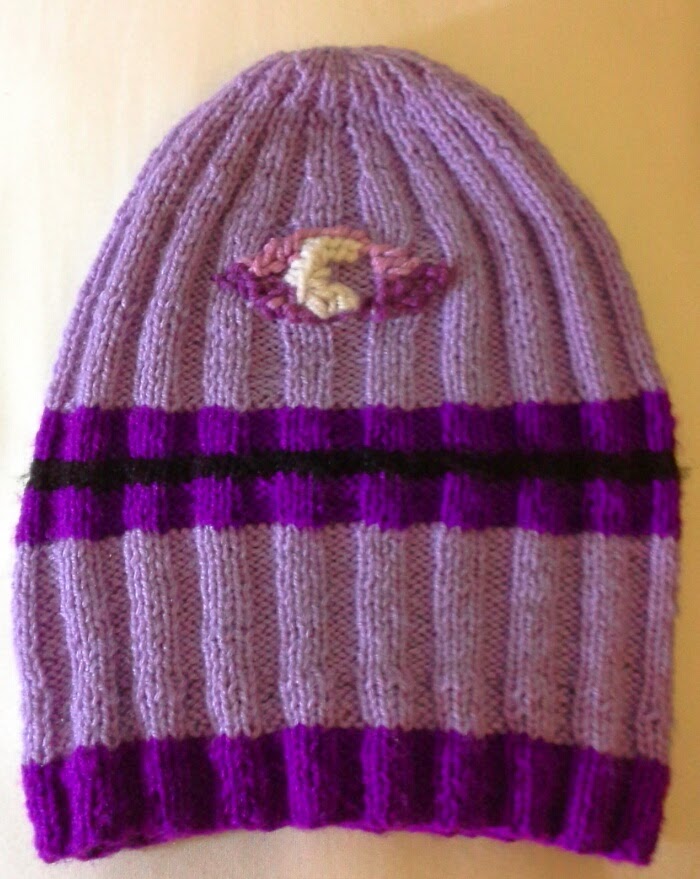
A Welcome to Night Vale beanie!

So I found out about the podcast (Welcome to Night Vale) and decided to give it a try, first episode over and I'm a fan, yeap, I got converted like all the rest, it must have been the power of the almighty glow cloud that reached through the interwebz ang grabbed me, or maybe the subliminal influence of the whispering forest, who knows (maybe the faceless old woman that secretly lives in my house knows), anyway, I decided to try my hand at making some kind of fangirl DIY project and this is the result.

I used 2.5 mm straight needles and the appropiate yarn for them in three main colors (light purple, dark purple and some black).
The gauge would be: 1 cm width = 2 sts, 1 cm height = 4 rows.
Long tail method to cast on 120 stitches, plus one knit stitch as border.
I worked a 3x3 ribbing for 15 cm changing the colors as I liked to make the stripes and leaving enough yarn in the different-color tails to sew the sides together at the end.
Here began the decreases:
The parenthesis stitches are supposed to be repeated all the way through the row.
(K3, P2tog, P1)... end with K1. And wrong side: P1, (K2, P3). This is 100 sts.
(K3, P2)... end with K1. And wrong side: P1, (K2, P3). Repeat these two rows.
(K2tog, K1, P2)... end with K1. And wrong side: P1, (K2, P2). This is 80 sts.
(K2, P2)... end with K1. And wrong side: P1, (K2, P2). Repeat these two rows.
(K2, P2tog)... end with K1. And wrong side: P1, (K1, P2). This is 60 sts.
(K2, P1)... end with K1. And wrong side: P1, (K1, P2). Repeat these two rows.
(K2tog, P1)... end with K1. And wrong side: P1, (K1, P1). This is 40 sts.
(K1, P1)... end with K1. And wrong side: P1, (K1, P1). Repeat these two rows.
(K2tog). And wrong side: Purl. This is 20 sts.
(K2tog). And wrong side: Purl. This will leave 10 sts.

Leave a long tail, pass through the remaining stitches, pull to make a tight circle. Sew sides together (with the corresponding color) and weave in the ends.

Now, to make the half moon/eye in the sky, I had some left over yarn in a slightly different hue of light and dark purple, and white yarn. I just picked a place and started weaving them around. The yarns were thicker so that's why it pops up, but I like the effect.


posted from Bloggeroid

Monday, February 10, 2014

A little DIY three.

I got some lightweight yarn the other day and decided to make myself some fingerless gloves following this great tutorial over on youtube:

Fingerless gloves - eyelet mock cable ribbing stitch

Here are Joanne's instructions (be sure to thank her if you make them!): 
 www.joannesweb.com

Size 4.5mm needles. Worsted yarn (#4) Cast on 41 sts.

Ribbing:
Row 1.- *p2, k3*...end with p1
Row 2.- k1 *p3, k2* end with k2
Repeat 6 times. 12 rows in total


Stitch: Eyelet Mock Cable Ribbing:
Row 1.-*p2, Slip as if to knit, knit 2, pass the one you sliped over these 2 knits* end with p1.
Row 2.- k1 *purl 1, yarn over needle, purl 1, knit 2* end with k2.
Row 3.- *p2, k3* end with p1.
Row 4.- k1 *p3,k2* end with k2
Repeat these 4 rows 11 times.


Sew from bottom (beginning of ribbing) until 5 repetitions of the stitch. Leave 2 repetitions of the stitch without sewing. Sew from top to bottom 4 repetitions of the stitch. Note. #1 is the Right Side.

I changed it a little bit to fit my hands and sewed two little triangles over the thumbs to make it cozier, they turned out awesome!

What I changed:
  • Instead of 41 stitches I cast on 46 sts, why? because the yarn I used was a tiny bit thinner than the one in the tutorial.
  • Instead of 11 repetitions of the cable design I did 9, why? because I wanted the cable design to be shorter so I could make a long top ribbing.
  • After the 9 repetitions I did Row 1 of the cable design once, why? because I wanted to make it look like the last "circle" was finished. This reduced the amount of stitches which suited me fine because:
  • I wanted to make the ribbing on my fingers (top ribbing) to fit tight around them. I had 29 stitches left, with which I did a 2x2 ribbing for 12 rows, that is:
Row 1 = *P2, K2*, end with P1.
Row 2 = K1, *P2, K2*, end with K2.
Repeat these two rows 6 times.

Now, because I changed the amount of cable repetitions I had to measure my hands to figure out until where I had to sew together in order to leave the thumb opening where it should be.


posted from Bloggeroid

Monday, January 27, 2014

A little DIY 2

I found this really cool blue/purple colored yarn and made myself an infinity scarf. Seed stitch with a border, in my mind it looks like blueberries so that's what I'm calling it, "the blueberry scarf" XD.


Cast on in multiples of 2 (add 6 stitches for both edges).

I cast on 3 stitches (border) + 20 + 3 more stitches (border), so 20+6, 26 sts in total. I used two skeins, which gave me enough length to wrap the scarf twice over my neck.

100 gr. yarn, 6.5 mm needles.

Row 1:  K2, P1, *K1, P1... end with K1, P1 and slip the last stitch as if to purl.
Row 2:  K2, P1, *P1, K1... end with K1, P1 and slip the last stitch as if to purl.
Repeat rows 1 and 2 until desired length. Bind off following the pattern. Sew ends together.

Pretty easy, right?

Sunday, January 19, 2014

A little DIY

So, I couldn't find a cover for my tablet that I liked, and the ones I did like did not fit the tablet.
What's a girl to do? Do It Yourself, of course.
Turns out it wasn't difficult at all. Yes, it does look "home made", not professional and whatnot, but I like it.
This was my first attempt, and I think I'll try to do some more in the future, there were some pretty fabrics I saw at the store, and now that I know what not to do, how to make it better by trial and error, I'm confident they'll turn out all right.

So, what I did: I copied the shape of the tablet in paper and cut it out to have a base or template to build around. I also measured the thickness of it to keep in mind for the fold.
I had an old cardboard file holder (pretty sturdy) that I used to cut out the book shape. I covered it with a hard white fabric that is used to give shape (glued it on).
I then measured and cut out three pieces of fabric, two for the white satiny interior and one for the blue-jeans exterior. I also cut 4 pieces of white elastic and placed them according to the template. I sewed it all together as if making a bag in which to put the cardboard in. I filled with cotton the part where the tablet screen would be covered to have a cushion of protection over it. I sewed it closed like a pillow.
Then I cut and sewed/glued the folding thingy to close it, with velcro, and I also glued a strip to hold a pen at the side.